Tuesday, November 19, 2024

How to Construct the Perfect 6x8 Shed Roof with Simple Plans

How to Construct the Perfect 6x8 Shed Roof with Simple Plans

Constructing the Perfect 6x8 Shed Roof: A Comprehensive Guide

This guide provides a detailed, step-by-step approach to constructing a robust and aesthetically pleasing 6x8 shed roof. Understanding the fundamentals of roof construction, including proper measurements, material selection, and assembly techniques, is crucial for a successful project. This guide assumes a basic understanding of carpentry and the use of common power tools. Safety precautions should always be prioritized throughout the construction process.

Phase 1: Planning and Preparation

Before commencing construction, meticulous planning is paramount. This phase involves determining the roof's design, acquiring necessary materials, and preparing the construction site.

1.1 Design Considerations

For a 6x8 shed, a simple gable roof is ideal due to its ease of construction and effective water runoff. The roof pitch, or slope, should be at least 4:12 (4 inches of rise for every 12 inches of run) to ensure adequate drainage. Steeper pitches are advisable in areas with heavy snowfall. Consider the aesthetic appeal of the roof in relation to the overall shed design. Sketching a preliminary design can help visualize the final product and identify potential challenges early on.

1.2 Material Selection

Choosing the right materials significantly impacts the roof's longevity and performance. The following are essential materials:

  • Roofing Sheathing: Oriented Strand Board (OSB) or plywood are common choices. Select sheathing that meets local building codes regarding thickness and structural integrity.
  • Roofing Underlayment: This acts as a secondary water barrier, protecting against leaks. Felt paper or synthetic underlayment are suitable options.
  • Roofing Material: Asphalt shingles are a cost-effective and readily available choice. Consider the climate and aesthetic preferences when selecting shingle type and color.
  • Rafters: Pressure-treated lumber is recommended for its resistance to rot and decay. The dimensions of the rafters will depend on the roof pitch and snow load requirements. Consult local building codes for specific requirements.
  • Ridge Board: A sturdy board forming the apex of the gable roof. Its dimensions should be compatible with the rafters.
  • Collar Ties/Purlins: These are optional but recommended for added stability, especially on longer spans. They connect opposing rafters, preventing outward thrust.
  • Fasteners: Use galvanized nails or screws to ensure resistance to rust and corrosion.
  • Flashing: Metal flashing is essential around chimneys, vents, and other roof penetrations to prevent water leakage.

1.3 Site Preparation

Ensure the shed's walls are properly constructed and level before starting roof construction. Clear the area around the shed to provide sufficient workspace. If necessary, erect scaffolding to facilitate safe and efficient work at heights.

Phase 2: Rafter Construction and Installation

This phase involves constructing and installing the rafters, which form the structural framework of the roof.

2.1 Rafter Calculations

Accurate rafter calculations are vital for a structurally sound roof. Use a rafter square or online calculator to determine the proper length and cuts for your chosen roof pitch. Factor in overhangs at the eaves and gable ends. Precise measurements prevent fitting issues and ensure the roof's stability.

2.2 Rafter Cutting and Assembly

Using the calculated measurements, cut the rafters to the appropriate lengths. The top ends of the rafters should be cut to fit snugly against the ridge board. The bottom ends (eaves) should be cut to create the desired overhang. Use a speed square and saw to ensure accurate cuts. Pre-drilling pilot holes before nailing or screwing prevents wood splitting.

2.3 Rafter Installation

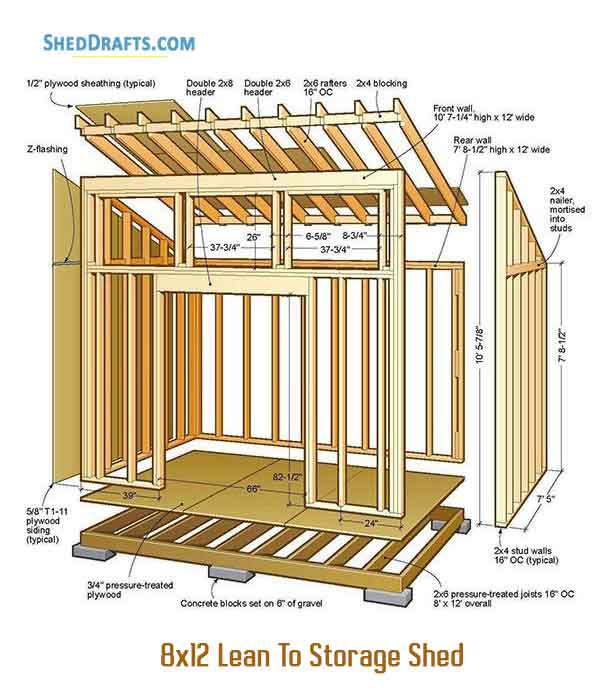
Begin by installing the ridge board atop the shed walls. Then, carefully position and secure the rafters to the ridge board and the top plates of the shed walls using appropriate fasteners. Maintain consistent spacing between rafters, typically 16 or 24 inches on center. Temporarily brace the rafters to ensure stability during installation. Use a level to verify the rafters are plumb and aligned correctly.

2.4 Collar Tie/Purlin Installation (Optional)

If using collar ties or purlins, install them to connect opposing rafters roughly midway between the ridge and the eaves. These members enhance the structural integrity of the roof, especially important in areas prone to high winds or snow load.

Phase 3: Sheathing, Underlayment, and Roofing

This phase involves covering the rafter framework with sheathing, underlayment, and finally, the roofing material.

3.1 Sheathing Installation

Attach the OSB or plywood sheathing to the rafters, ensuring proper alignment and overlap between sheets. Use galvanized nails or screws to secure the sheathing. Stagger the joints of adjacent sheets for improved strength and water resistance. Ensure the sheathing is flush with the rafters to create a smooth surface for the underlayment.

3.2 Underlayment Installation

Roll out the roofing underlayment over the sheathing, overlapping the edges according to the manufacturer's instructions. This layer provides an extra barrier against water penetration. Secure the underlayment with roofing staples or nails. Pay close attention to sealing around any penetrations or irregularities.

3.3 Roofing Installation

Begin installing the roofing material at the bottom edge of the roof, working your way up. Follow the manufacturer's instructions for shingle layout and overlap. Maintain consistent alignment and spacing for a neat and professional finish. Use roofing nails to secure the shingles. Pay special attention to flashing around any chimneys, vents, or other roof penetrations. Ensure proper ventilation to prevent moisture buildup under the roofing.

Phase 4: Final Inspection and Cleanup

Once the roofing is complete, conduct a thorough inspection to identify and rectify any imperfections. Clean up any debris from the construction site, ensuring safety and a clean working environment.

This comprehensive guide provides a framework for constructing a 6x8 shed roof. Always refer to local building codes and consult with professionals if needed. Careful planning, accurate measurements, and diligent execution are key to a successful project. Remember safety precautions throughout the construction process are paramount.

Read More..

6x8 Shed Building Plans for Practical Storage and Organization

6x8 Shed Building Plans for Practical Storage and Organization

6x8 Shed Building Plans for Practical Storage and Organization

The construction of a 6x8 shed offers a practical solution for addressing storage needs on a modest scale. This compact structure provides ample space for organizing various items, ranging from garden tools and lawn equipment to seasonal decorations and recreational gear. Detailed planning and careful execution are essential to ensure the shed's longevity and functionality. This comprehensive guide outlines the critical considerations and steps involved in building a robust and well-organized 6x8 shed.

I. Planning and Design Considerations

Before commencing construction, meticulous planning is crucial. This stage encompasses determining the shed's location, material selection, design features, and necessary permits.

A. Site Selection and Preparation

Choosing the optimal location for your shed is paramount. Factors to consider include:

  • Accessibility: Ensure easy access for loading and unloading items.
  • Ground Conditions: Evaluate the ground's stability and drainage to prevent settling and water damage.
  • Sunlight and Shade: Consider the impact of sunlight and shade on the interior temperature and the potential need for ventilation.
  • Utilities: Assess proximity to electrical outlets or potential for future additions like lighting or power tools.
  • Local Regulations: Check for local building codes and zoning regulations regarding shed placement and size limitations.

Once the location is selected, site preparation involves clearing the area, leveling the ground, and potentially compacting the soil to create a stable foundation.

B. Material Selection

The choice of materials significantly impacts the shed's durability, cost, and aesthetic appeal. Common materials include:

  • Wood: Offers a versatile and relatively inexpensive option, providing aesthetic flexibility.
  • Metal: Provides superior durability and weather resistance but can be more expensive and may require specialized tools for construction.
  • Vinyl: Offers low maintenance and excellent weather resistance, but can be less aesthetically appealing and more expensive than wood.

Selecting high-quality materials is essential for a long-lasting shed. Consider treated lumber for wood construction to enhance resistance to rot and insect infestation. For metal sheds, consider gauge thickness to ensure structural integrity.

C. Design Features and Functionality

Careful consideration of design features enhances the shed's functionality and organization:

  • Door Placement and Size: Optimizing door placement ensures easy access and efficient use of interior space. A double door may be preferable for larger items.
  • Window Placement: Windows provide natural light and ventilation. Consider the placement and size to maximize benefits.
  • Shelving and Workbench: Incorporate shelving and a workbench to improve organization and provide a workspace.
  • Flooring: Consider concrete, plywood, or composite decking for durable and easy-to-clean flooring.
  • Ventilation: Adequate ventilation is crucial to prevent moisture buildup and mildew. Include vents in the roof and walls.

II. Construction Process

The construction process involves several distinct stages, each requiring careful attention to detail.

A. Foundation Construction

A solid foundation is critical for the shed's stability. Options include:

  • Concrete Slab: Provides a level, durable base, ideal for heavier sheds.
  • Gravel Base: A more economical option suitable for lighter sheds. Requires careful leveling and compaction.
  • Pier and Beam: Elevates the shed off the ground, improving drainage and preventing moisture damage.

The chosen foundation method must align with local building codes and the weight of the completed shed.

B. Frame Construction

The frame construction involves assembling the walls, roof trusses, and door/window frames. Accuracy in measurements and precise joining techniques are crucial for structural integrity. Detailed plans and diagrams are essential at this stage. Using appropriate fasteners and ensuring squareness are crucial.

C. Siding and Roofing

Siding and roofing complete the shed's exterior. The chosen material’s installation process will vary. Ensure proper sealing and flashing to prevent water intrusion.

D. Interior Finishing

Interior finishing involves installing shelving, a workbench (if included in the design), and flooring. Careful consideration of organization is crucial at this stage. Consider using waterproof materials in areas prone to moisture.

III. Organization and Storage Solutions

Maximizing the shed's storage capacity and organization is crucial for its practical use. Several strategies enhance functionality:

A. Shelving Systems

Installing adjustable shelving maximizes vertical space and accommodates items of varying sizes. Consider materials like wood, metal, or plastic depending on the items stored.

B. Wall-Mounted Storage

Utilize wall space with pegboards, hooks, and racks to store tools and smaller items, keeping them readily accessible and preventing clutter.

C. Bin and Container Systems

Using labeled bins and containers for smaller items keeps them organized and easily identifiable. This is especially helpful for seasonal items or parts.

D. Vertical Storage Solutions

Utilize vertical space efficiently with tall shelves, stackable containers, or hanging organizers. This maximizes the use of the limited space within a 6x8 shed.

IV. Safety Precautions

Safety should be paramount throughout the entire building process. Always:

  • Wear appropriate safety gear: safety glasses, gloves, and hearing protection.
  • Use proper tools and techniques: Follow manufacturer instructions and safe operating procedures for all power tools.
  • Work with a partner: For lifting heavy materials or performing tasks requiring assistance.
  • Inspect regularly: Regularly inspect the structure for any signs of damage or wear.

By carefully planning, selecting appropriate materials, and following these construction steps, you can create a durable and well-organized 6x8 shed that provides years of practical storage and enhances the functionality of your property.

Read More..

Affordable 6x8 Firewood Shed Plans for Storing Your Wood

Affordable 6x8 Firewood Shed Plans for Storing Your Wood

Affordable 6x8 Firewood Shed Plans for Storing Your Wood

This comprehensive guide provides detailed plans for constructing an economical yet durable 6x8 firewood shed, perfect for storing your winter's fuel supply. The design prioritizes affordability and ease of construction, utilizing readily available materials and straightforward techniques. Detailed material lists, step-by-step instructions, and considerations for various climates are included to ensure a successful project.

I. Design Considerations and Material Selection

Before embarking on construction, careful planning is essential. The 6x8 footprint offers ample storage capacity for a substantial amount of firewood, while remaining manageable for DIY construction. This design prioritizes simplicity and cost-effectiveness without compromising structural integrity.

A. Foundation Options

The foundation choice significantly impacts both cost and longevity. Several options exist, each with its own advantages and disadvantages:

  • Gravel Base: This is the most affordable option, requiring simply leveling the ground and creating a 4-6 inch layer of compacted gravel. It offers good drainage but lacks the permanence of other options.
  • Concrete Slab: A poured concrete slab provides a robust and level base, ideal for heavier loads and prolonged use. However, it’s more expensive and requires more labor.
  • Pressure-Treated Lumber Skids: A simple and cost-effective solution involves creating a platform using pressure-treated lumber. This raises the shed off the ground, improving ventilation and preventing rot. Ensure proper spacing for air circulation.

For this plan, we will focus on the pressure-treated lumber skid foundation due to its balance of cost-effectiveness and durability.

B. Framing Materials

The framing material choice directly impacts the shed’s strength and longevity. Pressure-treated lumber is recommended for its resistance to rot and decay, ensuring the shed's structural integrity even in humid environments. Consider using:

  • 4x4 Pressure-Treated Posts: For corner posts and support beams.
  • 2x4 Pressure-Treated Lumber: For wall studs, rafters, and bracing.
  • 2x6 Pressure-Treated Lumber: For the floor joists (if using a platform foundation) or as a more robust alternative for wall studs.

C. Roofing Material

The roofing material choice influences both cost and aesthetics. Cost-effective options include:

  • Corrugated Metal Roofing: Durable, long-lasting, and relatively inexpensive. It's also weather-resistant and requires minimal maintenance.
  • Asphalt Shingles: A more traditional look, but generally more expensive than metal roofing and requires more careful installation.

For this budget-conscious design, corrugated metal roofing is the recommended choice.

D. Siding Material

Siding materials contribute to the shed's aesthetic appeal and weather protection. Affordable and practical choices include:

  • Plywood Siding: Relatively inexpensive and readily available, providing good protection when properly treated and sealed.
  • Shiplap Siding: Offers a more rustic and visually appealing finish, though it is typically more costly than plywood.

For this plan, pressure-treated plywood siding is recommended for its affordability and durability.

II. Step-by-Step Construction Guide

This section outlines the step-by-step process for constructing the 6x8 firewood shed. Detailed measurements and diagrams are crucial and should be consulted alongside these instructions. (Note: Diagrams and detailed measurements would be included in a full set of plans, which are beyond the scope of this text.)

A. Foundation Construction

  1. Level the ground where the shed will be located.
  2. Construct the pressure-treated lumber skid base: This involves creating a rectangular frame using 4x4 posts and 2x6 lumber for the platform.
  3. Ensure the base is level and firmly positioned on the ground.

B. Framing the Walls

  1. Cut and assemble the wall frames using 2x4 pressure-treated lumber.
  2. Ensure proper spacing for insulation (optional) and sheathing.
  3. Erect the wall frames onto the foundation, securing them firmly using appropriate fasteners.

C. Roofing Construction

  1. Construct the roof trusses or rafters using 2x4 lumber.
  2. Attach the trusses/rafters to the top plates of the wall frames.
  3. Install the corrugated metal roofing, ensuring proper overlap and sealing.

D. Siding Installation

  1. Install the pressure-treated plywood siding onto the wall frames, ensuring proper overlapping and sealing.
  2. Use appropriate fasteners and weatherproofing materials.

E. Door and Window Installation (Optional)

If desired, a door can be added for easier access to the firewood. A simple, hinged door can be constructed using pressure-treated lumber and appropriate hardware. Windows are optional but can improve ventilation and light within the shed.

III. Additional Considerations

Several factors influence the longevity and effectiveness of your firewood shed:

  • Ventilation: Proper ventilation is critical to prevent rot and mildew. Ensure sufficient airflow by leaving gaps between the wood and the walls.
  • Weather Protection: Choosing appropriate materials and ensuring proper sealing is crucial for protecting the firewood from moisture.
  • Pest Control: Consider implementing measures to prevent pest infestations, such as using pest-resistant lumber or installing mesh screens.
  • Local Building Codes: Check with your local building department to ensure compliance with any relevant regulations.

IV. Conclusion

Constructing an affordable 6x8 firewood shed is a feasible DIY project, offering a practical solution for storing your firewood efficiently and effectively. By carefully following these plans and considering the factors outlined above, you can create a durable and cost-effective storage solution that will serve you for years to come. Remember to always prioritize safety and use appropriate safety equipment during construction.

Disclaimer: This guide provides general instructions. Always consult with qualified professionals for specific advice and to ensure compliance with local building codes. Improper construction can lead to structural failure and safety hazards. The detailed plans with exact measurements and diagrams are not included here and should be sourced separately for a safe and successful project.

Read More..

8x12 Shed with Loft Plans: Everything You Need to Build the Perfect Shed

8x12 Shed with Loft Plans: Everything You Need to Build the Perfect Shed

8x12 Shed with Loft Plans: Everything You Need to Build the Perfect Shed

Dreaming of a spacious and organized storage solution? An 8x12 shed with a loft offers the perfect blend of ground-level storage and valuable overhead space. This comprehensive guide provides you with everything you need to design, plan, and build your ideal shed, transforming your outdoor space into a haven of functionality and style. Forget cramped, disorganized sheds; let's build something extraordinary!

Planning Your 8x12 Shed with Loft

Before you even pick up a hammer, meticulous planning is key. This phase sets the foundation for a successful build. Start by defining your needs. What will you store in the shed? How much vertical space do you require in the loft? Consider the weight of your belongingsâ€"this will directly impact the shed's structural requirements. Next, examine your chosen location. Check local building codes and zoning regulations. You'll need to assess site preparation, considering factors like leveling the ground and ensuring adequate drainage. Finally, sketch a preliminary design, factoring in both the ground floor and the loft area. This detailed plan will guide your material selection and construction process.

Choosing the Right Materials

Selecting high-quality materials significantly impacts the longevity and durability of your shed. Opt for pressure-treated lumber for the foundation and framing to resist rot and insect damage. Consider using composite decking for the floor and roof, offering exceptional weather resistance and minimal maintenance. For siding, explore options like vinyl, metal, or even reclaimed wood, depending on your aesthetic preference and budget. Remember to factor in the roofing materials; asphalt shingles provide a cost-effective and reliable choice, while metal roofing offers superior longevity and weather protection. Choosing the right materials up front saves time, effort, and potential headaches later in the project.

Detailed Construction Steps: Building Your Dream Shed

With your plans finalized and materials gathered, it's time to build! The process begins with preparing the foundation. This might involve creating a concrete slab, laying down gravel, or building a wooden frame. Ensure your base is perfectly level to prevent structural issues later. Next, erect the walls, carefully following your blueprint and using appropriate fastening techniques. Remember to incorporate proper bracing for strength and stability. Installing the roof structure is crucial; this involves building trusses or rafters and ensuring they are securely attached to the walls. Proper roof installation prevents leaks and provides overall structural integrity. Once the shell is complete, focus on sheathing, roofing, and exterior finishing.

Creating the Loft: Maximizing Vertical Space

Building the loft adds another dimension to your storage potential. Start by constructing a sturdy platform using pressure-treated lumber. Ensure adequate headroom and consider adding railings for safety. Use strong, evenly spaced supports to handle the weight of stored items. Remember to incorporate a staircase or ladder for easy access. Think about ventilation in the loft to prevent moisture build-up. A well-constructed loft doubles your usable space, offering a fantastic solution for seasonal items, tools, or even a small workspace.

Essential Tools and Equipment

Building an 8x12 shed with a loft requires a range of tools. Essential tools include a measuring tape, level, saw (circular saw and hand saw), hammer, drill, screwdriver, and various fasteners. You'll also need post hole diggers (if building a post-and-beam foundation), a shovel, and potentially a concrete mixer. Consider renting larger power tools like a nail gun or a post hole digger if you don't own them, saving you money on purchasing equipment you may only use once. Remember safety gear like safety glasses, work gloves, and hearing protection are crucial throughout the entire building process.

Finishing Touches and Customization

Once the structure is complete, personalize your shed! Consider adding windows for natural light and ventilation. Install a sturdy door with a reliable locking mechanism. Paint or stain the exterior to protect the wood and enhance the aesthetics. Inside, you can add shelving units, cabinets, or hooks for optimal organization. Consider adding electrical outlets and lighting if needed. The finishing touches transform a functional structure into a beautiful and highly organized addition to your property. Remember to document your progress with photos and notes.

Safety First!

Throughout the entire building process, prioritize safety. Always follow safe operating procedures for all power tools. Wear appropriate safety gear, and never work alone on tasks that require lifting or maneuvering heavy materials. If you're unsure about any aspect of the construction, consult a professional builder. A safe and well-planned project ensures a successful outcome and protects you from potential injury.

Building an 8x12 shed with a loft is a rewarding project. By following these detailed plans and prioritizing safety, you’ll create a valuable addition to your property, increasing storage space and enhancing your outdoor living area. Now get started and enjoy the process!

Read More..

Free 6x8 Shed Plans PDF for Gardeners and Outdoor Enthusiasts

Free 6x8 Shed Plans PDF for Gardeners and Outdoor Enthusiasts

Free 6x8 Shed Plans PDF for Gardeners and Outdoor Enthusiasts

This comprehensive guide provides detailed information on acquiring and utilizing free 6x8 shed plans in PDF format, specifically designed for gardeners and outdoor enthusiasts. A 6x8 shed offers a practical and versatile storage solution for various gardening tools, equipment, and outdoor recreational items. This document will thoroughly explore the benefits of such a structure, guide you through the process of finding reliable free plans, and offer valuable tips for construction and customization.

The Allure of a 6x8 Shed

A 6x8 foot shed represents an optimal balance between size and functionality. Its compact dimensions make it suitable for even smaller gardens or yards, while still providing ample storage space. The manageable size also simplifies the construction process, making it a feasible DIY project for individuals with moderate carpentry skills. This size is particularly beneficial for:

  • Storage of Gardening Tools and Equipment: Shovels, rakes, hoes, wheelbarrows, and other bulky gardening tools can be neatly organized within a 6x8 shed, protecting them from the elements and extending their lifespan.
  • Safekeeping of Potting Supplies: Bags of soil, fertilizers, potting mixes, and seeds find a secure and dry home, preserving their quality and preventing unwanted pest infestations.
  • Housing Outdoor Recreational Gear: From bicycles and sports equipment to camping gear and outdoor furniture, a 6x8 shed can accommodate a range of items, keeping them organized and protected.
  • Workspace for Smaller Projects: The space can be adapted to serve as a small potting bench area or workshop for smaller DIY projects, allowing for year-round gardening preparation.
  • Additional Storage for Household Items: It can also provide additional storage for items not readily stored within the main house, freeing up valuable indoor space.

Locating Reliable Free 6x8 Shed Plans in PDF Format

Finding trustworthy and comprehensive free plans is crucial for a successful DIY shed project. While many websites offer free plans, it's essential to verify their reliability and accuracy before commencing construction. Here's a strategic approach:

Utilizing Reputable Online Resources

Numerous websites dedicated to DIY projects and woodworking offer free shed plans. However, prioritize sites with established reputations and positive user reviews. Look for websites that provide detailed diagrams, comprehensive material lists, step-by-step instructions, and user feedback. Cross-referencing information from multiple sources is always advisable.

Scrutinizing Plan Content

Before downloading any plans, carefully review their content. Ensure the plans include:

  • Detailed Dimensions and Drawings: Accurate measurements are essential for a structurally sound shed.
  • Comprehensive Material List: A complete list of necessary materials, including quantities and specifications, prevents delays and ensures the project progresses smoothly.
  • Step-by-Step Instructions: Clear and concise instructions, potentially including photographs or illustrations, are vital for easy comprehension and successful construction.
  • Cutting Diagrams: Accurate cutting diagrams for the wood components are crucial for precise construction.
  • Assembly Instructions: Step-by-step guidance on assembling the various components of the shed.
  • Foundation Recommendations: Guidance on choosing an appropriate foundation for the shed, considering local soil conditions and climate.

Considering User Reviews and Feedback

Before committing to a particular set of plans, examine user reviews and feedback. This provides valuable insights into the accuracy, clarity, and overall effectiveness of the plans. Positive reviews indicate a higher probability of a successful project.

Essential Considerations Before Construction

Prior to initiating the construction process, several crucial factors need careful consideration:

Local Building Codes and Permits

Check with your local authorities to determine if building permits are required for a 6x8 shed. Building codes vary by location, and understanding the regulations is critical to avoid potential legal issues.

Site Selection and Preparation

Choose a level and appropriately sized area for your shed. Clear the site of any debris, vegetation, and obstructions. Consider drainage and potential water runoff.

Material Selection and Procurement

Use high-quality pressure-treated lumber for the shed's frame and flooring to ensure longevity and resistance to decay. Source all necessary materials in advance to avoid delays during construction.

Tools and Equipment

Ensure you have all the necessary tools and equipment, including measuring tools, saws, drills, hammers, screws, and other relevant hardware. Renting specialized tools might be more cost-effective than purchasing them.

Customization and Enhancements

While free plans provide a solid foundation, consider adding personal touches to customize your shed:

  • Windows and Ventilation: Adding windows and ventilation improves air circulation and reduces humidity, protecting stored items from moisture damage.
  • Shelving and Storage Solutions: Incorporating shelving and other storage solutions maximizes space utilization and provides organized storage.
  • Exterior Finishing: Painting or staining the shed not only enhances aesthetics but also protects the wood from the elements.
  • Locking Mechanism: A secure locking mechanism is crucial to protect the contents of your shed from theft or unauthorized access.
  • Workbenches: Integrating workbenches can transform the shed into a practical workspace for potting, repairs, or other gardening-related tasks.

By carefully following these guidelines, you can successfully utilize free 6x8 shed plans to construct a durable and functional storage solution, tailored to your specific needs as a gardener and outdoor enthusiast. Remember, thorough planning, meticulous execution, and attention to detail are key to a successful DIY project.

Read More..

DIY 8x12 Shed with Loft: Simple, Affordable Plans for Extra Storage

DIY 8x12 Shed with Loft: Simple, Affordable Plans for Extra Storage

DIY 8x12 Shed with Loft: Simple, Affordable Plans for Extra Storage

So, you're looking for extra storage space, huh? I get it. Clutter's a real beast, and garages and attics often become overflowing black holes. Building your own shed is a fantastic solution, especially if you're a little bit handy and love a good project. An 8x12 shed is the perfect size â€" big enough to be truly useful, but small enough to be a manageable DIY undertaking. And throwing in a loft? That’s just genius for maximizing your space!

This isn't going to be some super-technical, architect-level blueprint. This is your friendly neighborhood DIY guide, designed to get you thinking practically and efficiently. We'll go through the process step-by-step, highlighting the cost-saving measures and the simple choices that’ll keep things affordable.

Planning Your 8x12 Shed with Loft

Before you even think about grabbing a hammer, you need a plan. This doesn’t have to be a professional-level drawing (unless you're that way inclined!), but a solid sketch with measurements will save you headaches later on.

Choosing Your Location

First things first: where will your new shed reside? Consider these factors:

  • Accessibility: Will you need a vehicle to get materials to the site? Is there a clear path for moving the shed once it's built (if necessary)?
  • Sunlight: Too much shade can lead to moisture problems. A balance is key.
  • Local Regulations: Check with your local council or homeowner's association about building permits, setbacks (how far from property lines you can build), and height restrictions. This is super important; you don't want to build it only to have to tear it down.
  • Drainage: Make sure the ground slopes away from the shed to prevent water build-up.

Materials List: Keeping it Budget-Friendly

This is where you can really start saving. Don't be afraid to shop around! Consider these options:

  • Pressure-treated lumber: This is essential for the base and framing, providing rot resistance. Look for sales at lumber yards.
  • Recycled or reclaimed materials: If you're comfortable working with salvaged wood, you can significantly reduce costs. Check local salvage yards or even Craigslist.
  • Plywood for siding and roofing: Plywood is generally cheaper than individual boards and offers a clean finish.
  • Metal roofing: While slightly more expensive upfront, metal roofing lasts much longer and requires less maintenance than asphalt shingles.
  • Simple shed doors: Avoid fancy doors and hardware; simple, functional is best for saving money.

Construction: A Step-by-Step Approach

This section will provide a general overview. Remember to consult detailed building plans or tutorials for specific instructions.

Foundation

A simple concrete slab is ideal, but you can also use pressure-treated lumber for a cheaper, quicker base. Proper leveling is key here. A slightly uneven base will lead to problems later.

Framing

This is where your plan comes in handy. Build the walls and the roof frame according to your measurements. Use strong nails or screws to ensure stability. Don't forget to leave openings for windows and doors.

Sheathing and Siding

Apply your chosen sheathing (plywood, etc.) to the walls and roof. Then, add the siding (plywood, metal, etc.). A good tip is to use weather-resistant materials to prolong the shed's life.

Roofing

Install your chosen roofing material. Metal roofing is more durable but requires more expertise. Asphalt shingles are easier to work with but need more upkeep. Proper flashing (material used to prevent water leakage) is critical around the edges and chimney (if you have one).

Loft Construction

The loft adds a significant storage boost. Build a simple platform using pressure-treated lumber, ensuring it's securely attached to the walls. Consider adding a small ladder for easy access.

Doors and Windows

Install your doors and windows securely. Use appropriate weatherstripping to ensure a tight seal and prevent drafts and moisture.

Finishing Touches

Once the main structure is complete, add the finishing touches:

  • Painting or staining: Protect the wood from the elements and personalize your shed's look.
  • Insulation (optional): If you plan on using the shed in colder months, adding insulation will make it more comfortable.
  • Shelving and storage solutions: Maximize your storage space by installing shelves and other organizational tools.

Cost Considerations

The total cost will vary depending on the materials you choose and your location. However, you can easily build an 8x12 shed with a loft for under $2,000 if you're resourceful and do the work yourself. Remember, prioritizing simple design and readily available materials will keep costs down.

Frequently Asked Questions

Q: Do I need a building permit?

A: It depends on your local regulations. Check with your local council or homeowner's association before starting your project.

Q: How long will it take to build?

A: This varies depending on your experience and the complexity of your design. Expect to spend several weekends, possibly more.

Q: Can I build this shed without prior experience?

A: Yes, but you'll need to invest time in research and possibly some basic DIY skills. There are many online resources and tutorials available to guide you.

Q: What kind of tools will I need?

A: A basic set of hand tools (hammer, saw, measuring tape, level) and power tools (drill, circular saw) will be necessary.

Q: What if I encounter problems during construction?

A: Don't hesitate to seek help from experienced DIYers or consult online forums and communities. There's always someone willing to offer advice!

Building your own shed is incredibly rewarding. You'll save money, gain valuable DIY skills, and end up with a fantastic storage solution tailored to your needs. So grab your tools, plan your project, and get building! Remember, even small steps forward lead to big accomplishments. Good luck!

Read More..

Saturday, November 16, 2024

Plan Your Perfect 12x20 Lofted Shed for Maximum Garden Storage

Plan Your Perfect 12x20 Lofted Shed for Maximum Garden Storage

Optimizing Garden Storage: A Comprehensive Design Plan for a 12x20 Lofted Shed

The ideal garden shed transcends mere storage; it becomes an extension of the garden itself, a meticulously organized haven for tools, equipment, and supplies. This document outlines a comprehensive design plan for a 12x20 lofted shed, maximizing storage capacity and functionality while maintaining aesthetic appeal. The design prioritizes efficient space utilization, robust construction, and accessibility, ensuring years of reliable service for the discerning gardener.

I. Structural Considerations: Foundation, Framing, and Roofing

The foundation serves as the bedrock of the entire structure. A concrete slab offers superior longevity and stability compared to alternative options such as gravel bases. Its smooth surface facilitates easier cleaning and prevents pest infestation. The slab should be poured to a depth appropriate for local frost conditions, typically 4-6 inches, with a layer of compacted gravel beneath for improved drainage. The dimensions should be slightly larger than the shed footprint to allow for proper expansion and contraction.

A. Framing and Sheathing:

Pressure-treated lumber is the preferred choice for the framing, ensuring resistance to rot and insect damage. A conventional framed structure utilizing 2x4 studs spaced 16 inches on center offers sufficient strength for a 12x20 shed. For added durability, consider upgrading to 2x6 studs, particularly for areas subject to higher wind loads. The sheathing should consist of OSB (Oriented Strand Board) or plywood, providing a solid base for the exterior cladding. Proper bracing and strapping are crucial to withstand wind and snow loads according to local building codes.

B. Roofing System:

The choice of roofing material depends on aesthetic preferences and budgetary constraints. Asphalt shingles are a cost-effective and readily available option, offering good protection against the elements. Metal roofing provides superior longevity and durability, resisting fire and high winds, but carries a higher initial cost. Regardless of the material selected, proper ventilation is critical to prevent moisture buildup and extend the lifespan of the roof. Consider incorporating ridge vents and soffit vents for optimal airflow.

II. Interior Design: Optimizing Space and Accessibility

The interior layout should prioritize efficient use of space and easy access to stored items. The lofted design significantly increases storage capacity, allowing for the storage of less frequently used items overhead. A sturdy staircase or a retractable ladder is essential for safe access to the loft.

A. Shelving and Storage Solutions:

A well-designed shelving system is critical for maximizing vertical space. Adjustable shelves allow for flexible configuration to accommodate items of varying sizes. Consider a combination of deep shelves for larger items such as pots and tools, and narrower shelves for smaller items like seeds and gardening gloves. The use of heavy-duty shelving units ensures the stability of even heavily loaded shelves. Wall-mounted pegboards provide additional storage for smaller tools and accessories, keeping them readily accessible.

B. Workbenches and Countertops:

Integrating a workbench into the shed’s design provides a dedicated space for potting plants, repairing tools, and other gardening tasks. A solid countertop made of durable materials like laminate or stainless steel is ideal for its ease of cleaning and resistance to stains and moisture. Sufficient lighting above the workbench is crucial for comfortable work. Consider installing overhead fluorescent lights or LED strip lighting.

C. Loft Storage:

The loft area should be designed to accommodate bulky items such as holiday decorations, less frequently used equipment, and seasonal supplies. Constructing sturdy shelving units within the loft maximizes its storage potential. Adequate headroom within the loft is crucial for ease of access and retrieval of stored items.

III. Exterior Design and Finishing

The exterior of the shed should complement the overall aesthetic of the property. The choice of siding material impacts both the appearance and the durability of the structure. Vinyl siding offers low maintenance and a wide variety of colors, while wood siding provides a more natural and rustic look, but requires regular maintenance.

A. Doors and Windows:

A double door provides easy access for larger items such as wheelbarrows and lawnmowers. Consider the addition of windows to enhance natural light and ventilation. Double-pane windows offer superior insulation and noise reduction. The selection of durable hardware, such as strong hinges and a robust locking mechanism, ensures longevity and security.

B. Painting and Finishing:

Applying a high-quality exterior paint protects the shed from the elements and enhances its aesthetic appeal. Choose a paint formulated for exterior use, ensuring resistance to fading, chipping, and peeling. Regular maintenance, including repainting as needed, prolongs the shed's lifespan and maintains its appearance.

IV. Electrical and Plumbing Considerations

Adding electrical outlets and potentially plumbing expands the functionality of the shed significantly. Consult with a qualified electrician and plumber to ensure that all work complies with local building codes and safety regulations.

A. Electrical System:

Installing electrical outlets provides power for tools and lighting. A dedicated circuit breaker is essential to protect the shed's electrical system. Proper grounding and wiring are crucial for safety. Consider incorporating weatherproof outlets and switches.

B. Plumbing Considerations (Optional):

If desired, a water supply can be added to the shed for a hose bib or a sink. This necessitates running a water line from the main house or a well, requiring professional installation. Proper drainage and waste disposal systems are critical if plumbing is integrated.

V. Environmental Considerations

Sustainable building practices should be considered throughout the design and construction process. Utilizing reclaimed or sustainably sourced lumber reduces the environmental impact. Consider incorporating energy-efficient lighting and insulation to minimize energy consumption. The proper disposal of construction waste is also essential for environmental responsibility.

By carefully considering these design elements, the 12x20 lofted shed can become a highly functional and aesthetically pleasing addition to any garden, providing years of reliable storage and enhancing the overall gardening experience.

Read More..
 
Bobby Crouser - Powered By Blogger